How to Use Kivy and KivyMD to Build a WhatsApp Status Saver App
A comprehensive guide to building an Android App using Python


Table of contents
- Prerequisites
- Python 3 or a higher version, download from here
- Kivy (pip install Kivy)
- KivyMD (pip install kivymd) -- note that this would only work if you already have Kivy installed.
- Understanding the Concept Behind the App
- Modules/Libraries and What You Need Them For
- Making Use of the Template
- Dividing App Layout into Screens
- Working on the KV Code
- Working with the Statuses and Generating Thumbnails with OpenCV
- Building the Home Screen to Display Image Statuses
- Adding the Images and Videos for the WhatsApp Statuses
- Finishing up the Images
- Working on the Videos
- Building the Control Bar to Interact with Video Statuses
- Adding the Play, Previous and Next buttons
- Now What?
Have you ever wondered how a WhatsApp status saver is built? Perhaps you've wanted to save your interesting WhatsApp statuses on your device. You've come to the right place! In this tutorial, you're going to learn how to build your own WhatsApp status saver using Python. You will be able to use the app to save your images and videos in a custom directory and view them in your gallery.
Prerequisites
Python 3 or a higher version, download from here
Kivy (pip install Kivy)
KivyMD (pip install kivymd) -- note that this would only work if you already have Kivy installed.
OpenCV (pip install opencv-python)
Understanding the Concept Behind the App
One thing you should know is that WhatsApp has a directory for storing your stories (only images and videos), and those of your friends, on your phone, temporarily. You can check this directory yourself by opening File Manager and then navigating to Internal storage > WhatsApp > Media > .Statuses. The dot before the files you see on some of the folders means that they are temporary and are just like caches. The idea is to filter out the images and the videos from the folder, but separately; let’s call that the backend since our user probably has no idea what is going on. What you want the user to see is just the images and videos on different screens where they can interact with the app and save the image or video they like. Let’s call that the frontend, and let’s connect both the frontend and backend using the power of code.
Modules/Libraries and What You Need Them For
os - You need the OS module to check if a directory already exists and to make your custom directories for the app.
cv2 - The OpenCV library provides a way for you to make png thumbnails for the video stories by reading the video files and generating an image of 1000x600 size from the frames.
glob - This special preinstalled Python module allows you to iterate through directories and get the filenames with the specified patterns.
time - Since you'd have to create your custom filename for each status saved. You will use the time module to get the current time, and that includes the hour, minute and essentially the second; since including the second would help you to avoid filename duplicates when saving images or videos. The user can save at the same date, hour, and minute, but not the same second.
shutil - Heard of this? When you copy and move files on your phone or desktop, this module can do just that. Since you're getting the stories from the WhatsApp folder, you would need to copy them from the folder unto the custom folders you created using the os module. This allows you to save the stories from the source (WhatsApp/Media/.Statuses) in your custom directory: (WSS/Images) for the images, and (WSS/Videos) for the videos. Otherwise, if you moved them, you would be surprised by the number of missing statuses on your WhatsApp application. Don't say I didn't warn you.
datetime - A good module for you to get the current date, including the day, month, and year (in numbers), and this would help you when naming the saved stories.
Kivy - This library allows you to import classes and use them in your code. The only classes you will need from Kivy are Builder, Video, Window, and StringProperty. Builder lets you parse your KV code into your main Python code so you can access everything from the main app class; Video, as it sounds is the class you will use to create instances of the video WhatsApp stories; Window allows you to set the screen size of your app, to simulate a real Android phone's screen size. The size I'd recommend is 360x640 since this is what Figma uses for Android frames when creating UI/UX designs; finally, the StringProperty gives you the chance to set your own attributes so you can use them in your classes. The application of StringProperty in this app is to create a label attribute which tells the position of each image and the total number of images, this applies to videos too. When you see 5/9, it means that is the fifth image or video, from the 9 total number of videos or images.
KivyMD - You will need many classes from this library to style the app and create nice widgets, the most important one is the MDApp class you would need to get your app running. In your driver code, you will create an instance of the app class and use the run() method to give it a window and make your app run.
Making Use of the Template
To make things easier while building apps in Python, I have a custom template code I have written and I duplicate the file anytime I want to build a project using Kivy and KivyMD. The template has the basic imports from Kivy and KivyMD; KV Code (the docstring stored in the KV variable) containing a Screen manager with an id we can reference later in our code; three empty Screens; the App class and the basic functions; a custom function you can edit; and the driver code that starts the engine (runs the app). Here is the template code below, you can edit it the way you like and use it in every app you want to build using Python, just make sure you're solving a problem.
"""
Project:
By:
On:
For: Solving the problem of...
"""
#Imports
from kivy.lang import Builder
from kivymd.app import MDApp
#KV
KV = """
ScreenManager:
    id: sm
    Screen:
        name: ""
    Screen:
        name: ""
    Screen:
        name: ""
"""
#Classes
class AppName(MDApp):
    def __init__(self, **kwargs):
        super().__init__(**kwargs)
        self.screen = Builder.load_string(KV)
    def build(self):
        return self.screen
    def another_function(self):
        return "None?"
#Driver code
if __name__ == "__main__":
    AppName().run()
Here are all the classes and modules you need to install, you can update the template code and run the app. I have added the window size by using a method from the Window class, it takes in a tuple of (Width, Height), and in this case, you will use (360, 640) or any size you want based on your choice. You should get a blank screen with no widgets when you run the app, congratulations on running the app successfully.
#...
#Imports
import os
import cv2
import glob
import time
import shutil
from datetime import date
from kivy.lang import Builder
from kivymd.app import MDApp
from kivymd.toast import toast
from kivy.uix.video import Video
from kivy.core.window import Window
from kivymd.utils.fitimage import FitImage
from kivymd.uix.floatlayout import MDFloatLayout
from kivymd.uix.boxlayout import MDBoxLayout
from kivymd.uix.imagelist import SmartTileWithLabel
from kivy.properties import StringProperty
Window.size = (360, 640)
Dividing App Layout into Screens
The template has three screens and the first two screens of the app are like subscreens of the home screen. There are two tabs we can toggle to view whether the images only or the videos only, the third screen will be for the fullscreen mode for each of the images. This is where the image clicked on by the user is viewed in fullscreen mode and the user can interact with it, by saving it or swiping left or right; this screen will have a toolbar, a back arrow that leads to the previous screen - the home screen, and a method of swiping left or right to view the images. The last screen in our app is for the videos, the user can play/pause the current video in play, they can seek by using a slider and do pretty much every basic thing you could ever do with a video player. Keep note that the video can also be saved from the same screen.
Working on the KV Code
The first thing to do is import the NoTransition class from the ScreenManager module from Kivy. You will need this since it allows you to control the transition when moving from a screen to another. Note that this only works for the screens and not the image and video tabs. You can use any transition you want, as many options are available on the Kivy website. After this, you can write the code for the image and video tiles.
#...
KV = """
#: import NoTransition kivy.uix.screenmanager.NoTransition
<ImageTile>:

    MDIconButton:
        icon: "fullscreen"
        theme_text_color: "Custom"
        text_color: (1, 1, 1, 1)
        pos_hint: {"center_x": .9, "center_y": .1}
        on_release:
            app.ImageFullscreen(root.source)
    MDFloatLayout:
        pos_hint: {"center_x": .85, "center_y":.92}
        size_hint: .2, .1
        canvas.before:
            Color:
                rgba: (0, 0, 0, 1)
            RoundedRectangle:
                radius: [20,]
                pos: self.pos
                size: self.size
        MDLabel:
            pos_hint: {"center_x": .5, "center_y": .5}
            text: root.label
            theme_text_color: "Custom"
            text_color: 1, 1, 1, 1
            bold: True
            size_hint_x: 1
            halign: "center"
<VideoTile>:

    MDIconButton:
        icon: "play-circle-outline"
        theme_text_color: "Custom"
        text_color: (1, 1, 1, 1)
        user_font_size: "80sp"
        pos_hint: {"center_x": .5, "center_y": .5}
        on_release:
            app.VideoFullscreen(root.source)

    MDFloatLayout:
        pos_hint: {"center_x": .85, "center_y":.1}
        size_hint: .2, .1
        canvas.before:
            Color:
                rgba: (0, 0, 0, 1)
            RoundedRectangle:
                radius: [20,]
                pos: self.pos
                size: self.size
        MDLabel:
            pos_hint: {"center_x": .5, "center_y": .5}
            text: root.label
            theme_text_color: "Custom"
            text_color: 1, 1, 1, 1
            bold: True
            size_hint_x: 1
            halign: "center"

#...
Working with the Statuses and Generating Thumbnails with OpenCV
The ImageTile is the class for the images and you will use that for all the images and add them to a Grid layout class having just two columns. The fullscreen icon button allows the user to navigate to the fullscreen mode where he can interact with the images. Meanwhile, in your main python code, don't forget to add the ImageFullscreen() function which takes in an argument of the source of the image tile. When creating your ImageTile class in the python code, you will need to add the label attribute so you can use it in the black rounded rectangle aligned to the top right of the image tile. The same principles apply to the VideoTile, just that the label is placed at the bottom right corner of the tile and the play icon button is placed centrally.
#...
class ImageTile(SmartTileWithLabel, MDFloatLayout):
    label = StringProperty("")

class VideoTile(SmartTileWithLabel, MDFloatLayout):
    label = StringProperty("")

class WaSS(MDApp):
    def __init__(self, **kwargs):
        super().__init__(**kwargs)
        self.screen = Builder.load_string(KV)
    def build(self):
        return self.screen
    def ImageFullscreen(self, current_source):
        pass
#...
Now, you have to add a global function - the generate_thumbnail() function. OpenCV is used to generate the thumbnail from the filename of the video and this would save it in the WSS/Thumbnails directory you will create in your build() function. This function will be added outside the main app class, preferably above it.
#...
def generate_thumbnail(video_fn):
    output_fn = video_fn[:-4]+".png"
    vcap = cv2.VideoCapture(video_fn)
    res, im_ar = vcap.read()
    while im_ar.mean() < 50 and res:
          res, im_ar = vcap.read()
    im_ar = cv2.resize(im_ar, (1000, 600), 0, 0, cv2.INTER_LINEAR)
    cv2.imwrite("WSS/Thumbnails/"+output_fn, im_ar)
    return output_fn
#... In your main app class
    def build(self):
        path = "/storage/emulated/0/WhatsApp/Media/.Statuses/*.jpg"
        if not os.path.exists("WSS"): # "/storage/emulated/0/WSS"
            os.makedirs("WSS/Images")
            os.makedirs("WSS/Videos")
            os.makedirs("WSS/Thumbnails")
#...
I would assume that you are working on a Windows/MAC computer since the app has not been deployed yet, that's why you will need to change some of the paths you give in your code. Also, remember to remove the Window.size = (360, 640) code before you deploy the app. The path variable stores the path of the stories saved by WhatsApp on your Android phone. The asterisk before jpg is a way you would use to select all the images with that extension when you use the glob module.
In your build function, you will write the codes for the app to run immediately after the window is created. Since you'd not want to keep the user waiting for the images and videos to load, you will loop through all the images and videos, and append them to three different lists you will create immediately after declaring the app class. Since the generate_thumnail() function returns the file name of the generated thumbnail, you will also append the filenames to the fs_vid_thumbnails list. Here is the code from the main app class to the build function:
#...
class WaSS(MDApp):
    fs_imgs = []
    fs_vids = []
    fs_vid_thumbnails = []

    def __init__(self, **kwargs):
        super().__init__(**kwargs)
        self.screen = Builder.load_string(kv)

    def build(self):
        path = "/storage/emulated/0/WhatsApp/Media/.Statuses/*.jpg"
        if not os.path.exists("WSS"): # "storage/emulated/0/WSS"
            os.makedirs("WSS/Images")
            os.makedirs("WSS/Videos")
            os.makedirs("WSS/Thumbnails")
        for i, file in enumerate(glob.glob("*.jpg")):
            self.fs_imgs.append(file)
        for i, file in enumerate(glob.glob("*.mp4")):
            self.fs_vid_thumbnails.append(generate_thumbnail(file))
            self.fs_vids.append(file)

#...
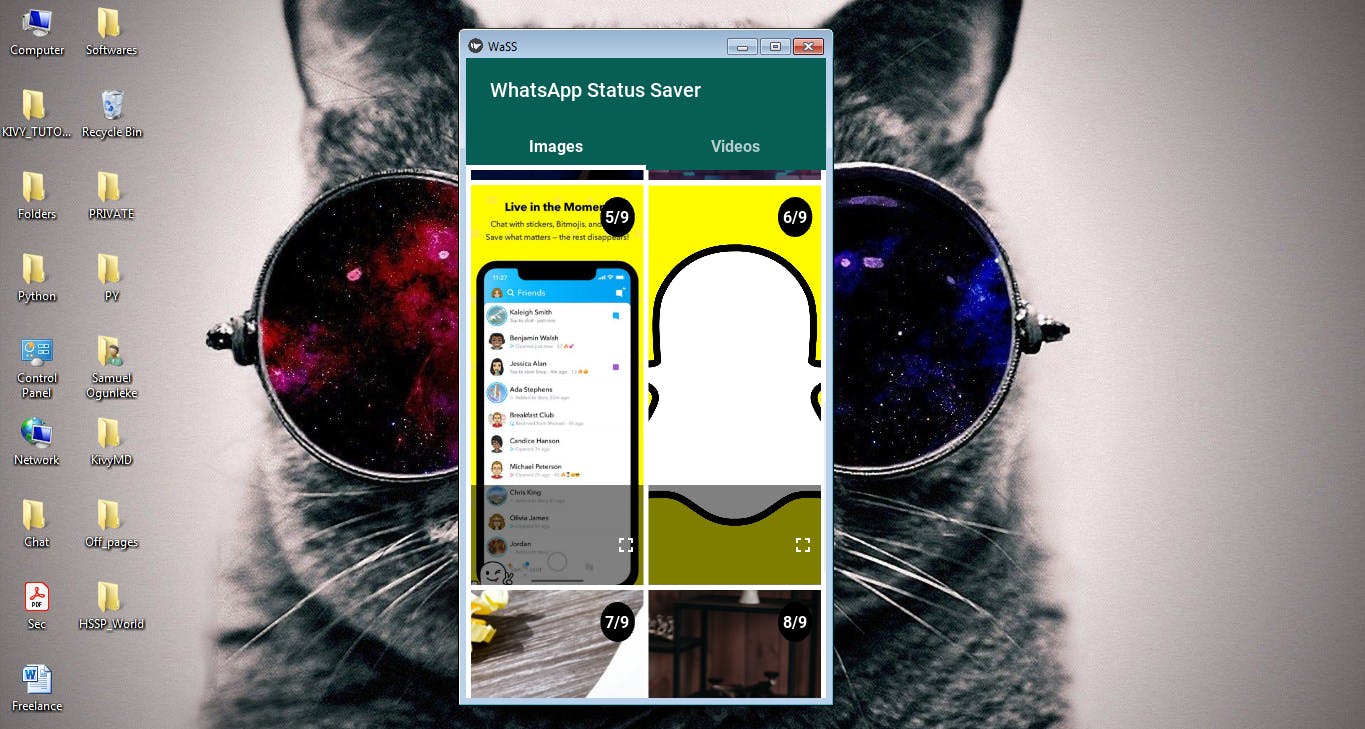
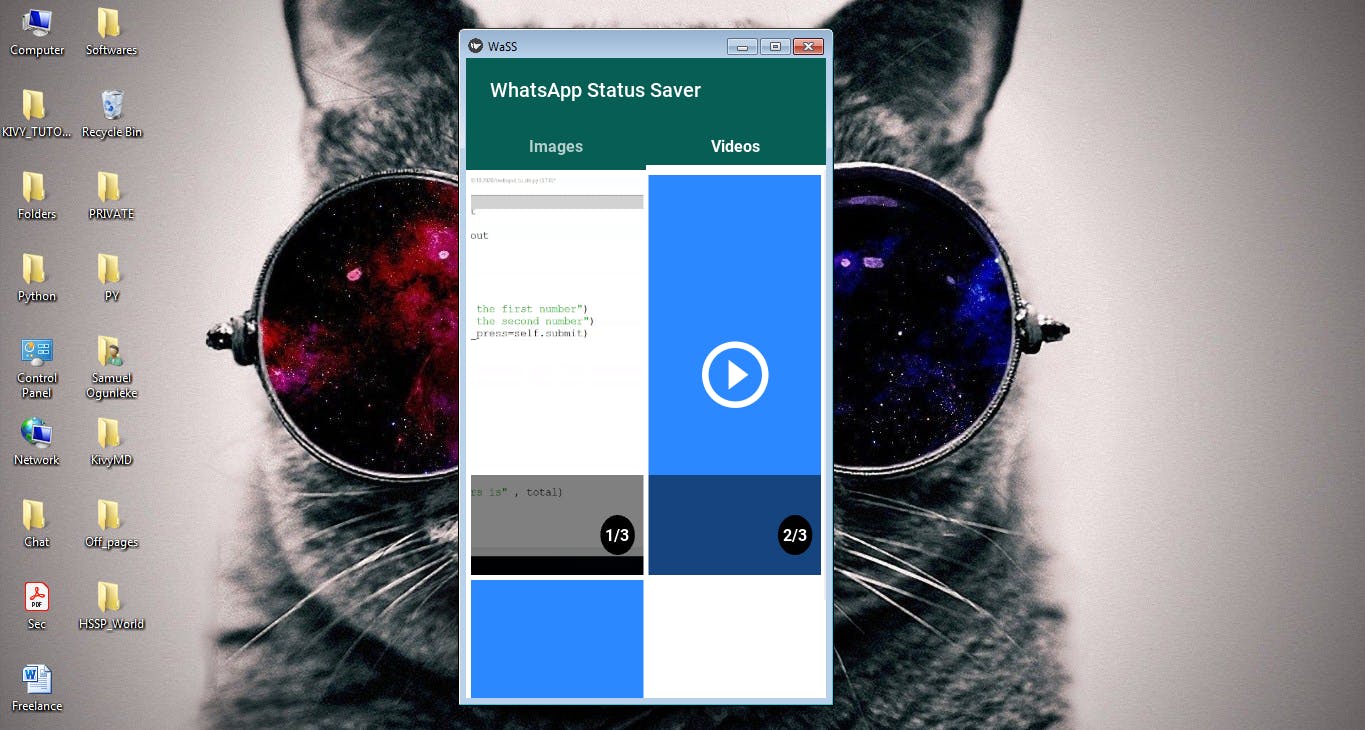
Building the Home Screen to Display Image Statuses
The home screen is the first screen displayed to the user after the app is run. It is always a good practice to give the screen manager an id so that you can access it from any part of your KV code or main app class. There is a toolbar that displays the title of your app and a container for the 'Images' and 'Videos' tabs and these two widgets (MDToolbar and MDTabs) have been added under a stack layout container so the MDToobar is placed exactly on top of the MDTabs, nicely.
KV = """
#...
ScreenManager:
    id: sm
    transition: NoTransition()

    Screen:
        name: "home"

        MDStackLayout:

            MDToolbar:
                title: "[b]WhatsApp Status Saver[/b]"
                pos_hint: {"top": 1}
                size_hint_y: None
                markup: True
                md_bg_color: .0274509803921569, .3686274509803922, .3294117647058824, 1

            MDTabs:
                on_tab_switch: app.on_tab_switch(*args)
                valign: "center"
                pos_hint_y: None
                indicator_color: (1, 1, 1, 1)
                tab_hint_x: True
                allow_stretch: True
                tab_indicator_height: '5dp'
                background_color: .0274509803921569, .3686274509803922, .3294117647058824, 1

                Tab:
                    text: "[b]Images[/b]"
                    markup: True

                Tab:
                    text: "[b]Videos[/b]"
                    markup: True
"""
#...
In your main python code, you would have to create the Tab class so that you don't get a factory error when you run the code. The on_tab_switch() is the function called by the MDTabs class when the user switches tabs, this would return None since you'd not need it for anything in this app.
#...
KV = """
#...
<Tab@MDFloatLayout+MDTabsBase>

ScreenManager:
    id: sm
    transition: NoTransition()
    #...
"""

class WaSS(MDApp):
    #...
    def on_tab_switch(
        self, instance_tabs, instance_tab, instance_tab_label, tab_text
    ):
        return None
#...
Now, you will need to add widgets under the tabs. For the 'Images' Tab, you will need a ScrollView widget so that the user can scroll vertically through the screen. There is also a need to add a GridLayout widget under the scroll view to contain the image tiles. The grid layout has two columns and the number of rows will be determined by the number of images in the .Statuses folder. It's also necessary to set the adaptive_height to True so that the images can be scrollable. For the 'Videos' tab, you would add the same widgets as those of the 'Images' tab. The only difference is the id of each of the grid layouts in both tabs.
#...
KV = """
#...
            MDTabs:
                on_tab_switch: app.on_tab_switch(*args)
                valign: "center"
                pos_hint_y: None
                indicator_color: (1, 1, 1, 1)
                tab_hint_x: True
                allow_stretch: True
                tab_indicator_height: '5dp'
                background_color: .0274509803921569, .3686274509803922, .3294117647058824, 1


                Tab:
                    text: "[b]Images[/b]"
                    markup: True

                    ScrollView:
                        MDGridLayout:
                            id: con
                            adaptive_height: True
                            spacing: 5
                            cols: 2
                            padding: 5
                            md_bg_color: 1, 1, 1, 1
                Tab:
                    text: "[b]Videos[/b]"
                    markup: True

                    ScrollView:
                        MDGridLayout:
                            id: vcon
                            adaptive_height: True
                            spacing: 5
                            cols: 2
                            padding: 5
                            md_bg_color: 1, 1, 1, 1

#...
"""
#...
Adding the Images and Videos for the WhatsApp Statuses
It's time to start displaying some content for the user, you will include the code to add the tiles for the images and videos under the corresponding grid layout classes, referencing them by their ids. You will need to just update the build() code block and add the tiles using loops to select the source of each image and thumbnail that the user can see and interact with. Python's enumerate() function allows you to get the file names and their indices. You need the indices to get the position of the tiles so you can use them in your label attribute. Since indexing in Python starts from 0, you will have to add 1 to each index and include the result and the length of the fs_imgs or fs_vid_thumbnails, as appropriate.
#...
    def build(self):
        path = "/storage/emulated/0/WhatsApp/Media/.Statuses/*.jpg"
        if not os.path.exists("WSS"): # "storage/emulated/0/WSS"
            os.makedirs("WSS/Images")
            os.makedirs("WSS/Videos")
            os.makedirs("WSS/Thumbnails")
        for i, file in enumerate(glob.glob("*.jpg")):
            self.fs_imgs.append(file)
        for i, file in enumerate(glob.glob("*.mp4")):
            self.fs_vid_thumbnails.append(generate_thumbnail(file))
            self.fs_vids.append(file)
        for i, file in enumerate(self.fs_imgs):
            self.screen.ids.con.rows = i
            imageTile = ImageTile(
                                        source= file,
                                        size_hint= (1, None),
                                        size= (100, 400),
                                        label=f"{i+1}/{len(self.fs_imgs)}",
                                        )
            self.screen.ids.con.add_widget(imageTile)
        for i, thumbnail in enumerate(self.fs_vid_thumbnails):
            self.screen.ids.vcon.rows = i
            videoTile = VideoTile(
                                        source= thumbnail,
                                        size_hint=(1, None),
                                        size=(100, 400),
                                        label=f"{i+1}/{len(self.fs_vid_thumbnails)}",
                                        )
            self.screen.ids.vcon.add_widget(videoTile)
##        print(self.screen.ids.carousel.current_slide)
        return self.screen
#...
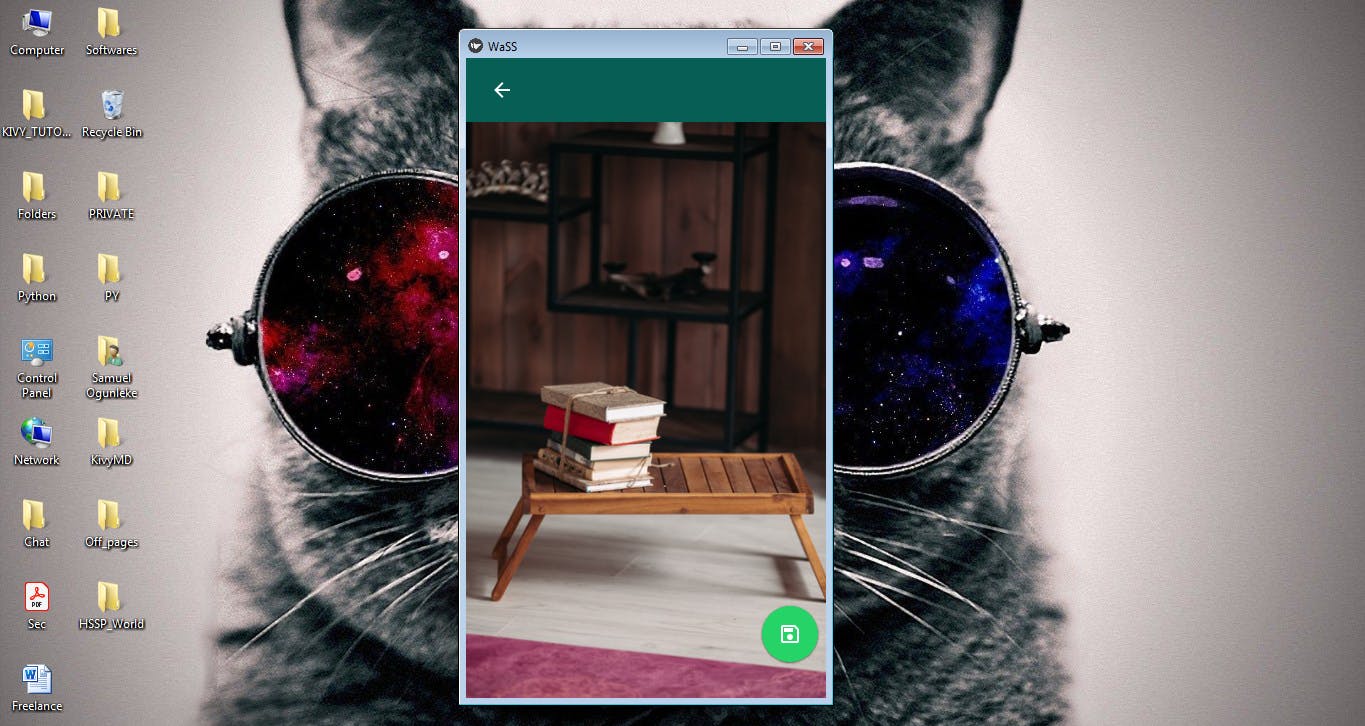
Finishing up the Images
Since the user can click on a fullscreen icon button to display the corresponding image in a separate screen where the user can save it, swipe left or right, and navigate back to the home screen, you will need to use the second screen in the template and create a separate screen for the fullscreen mode. However, you will have to update the ImageFullscreen function code block to add all the images to the MDCarousel widget which is the container that controls the swiping left or right actions by the user.
#...
KV = """
#...
    Screen:
        name: "imgfs"

        MDFloatLayout:
            id: imcon
            orientation: "vertical"
            md_bg_color: 0, 0, 0, 1

            MDStackLayout:
                MDToolbar:
                    title: ""
                    pos_hint: {"top": 1}
                    size_hint_y: None
                    markup: True
                    left_action_items: [["arrow-left", lambda x: app.back()]]
                    md_bg_color: .0274509803921569, .3686274509803922, .3294117647058824, 1

                MDCarousel:
                    id: carousel


            MDFloatingActionButton:
                icon: "content-save-outline"
                md_bg_color: .1450980392156863, .8274509803921569, .4, 1
                pos_hint: {"center_x": .9, "center_y": .1}
                on_release:
                    app.save_image()

#...
"""
#...
    def ImageFullscreen(self, current_source):
        for source in self.fs_imgs:
            ft = FitImage(
                    source=source,
                    pos_hint= {"center_x":.5, "center_y":.5},
                    size_hint= (1, 1))
            self.screen.ids["img"] = ft
            self.screen.ids.carousel.add_widget(ft)
        current_index = self.fs_imgs.index(current_source)
        self.screen.ids.carousel.index = current_index
        self.screen.current = "imgfs"
#...
The back button in the toolbar navigates back to the home screen by using a function in the main app class. You would create the back() function since the on_release() event of the back button can only be controlled by using a lambda function. If you'd prefer not to write a back() function, you would have to create a custom toolbar and add an icon button class; I'm sure you'd not want to give that a second thought. To save the image, you will use the datetime and time modules to get the current date and time. The strftime() method allows you to format the time and you'll separate the figures by using underscores. The active image on the fullscreen will be saved when the save button is pressed, and this would call the save_image() function which uses the current index of the carousel and selects the corresponding image from the list of images (fs_imgs) you created earlier. You are making things nice by displaying a toast message to the user, stating that the image has been saved.
#...
    def back(self):
        self.screen.current = "home"
    def save_image(self):
        #print(self.screen.ids.carousel.index)
        dnow, c_time = date.today(), time.strftime("%H_%M_%S")
        c_date = dnow.strftime("%m_%d_%y")
        save_as_fn = f"WSS_IMG_{c_date}_{c_time}.png"
        shutil.copy(self.fs_imgs[self.screen.ids.carousel.index], f"WSS/Images/{save_as_fn}")
        toast("Image saved!")
#...
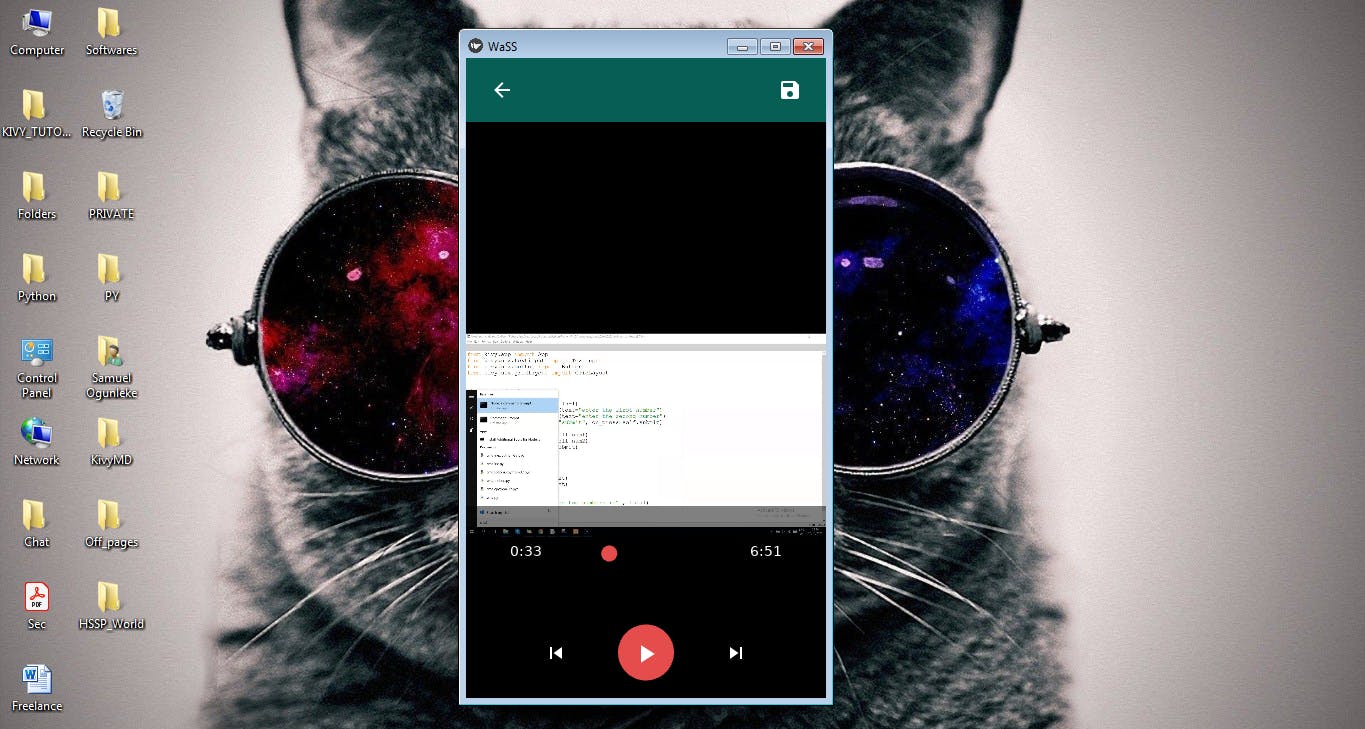
Working on the Videos
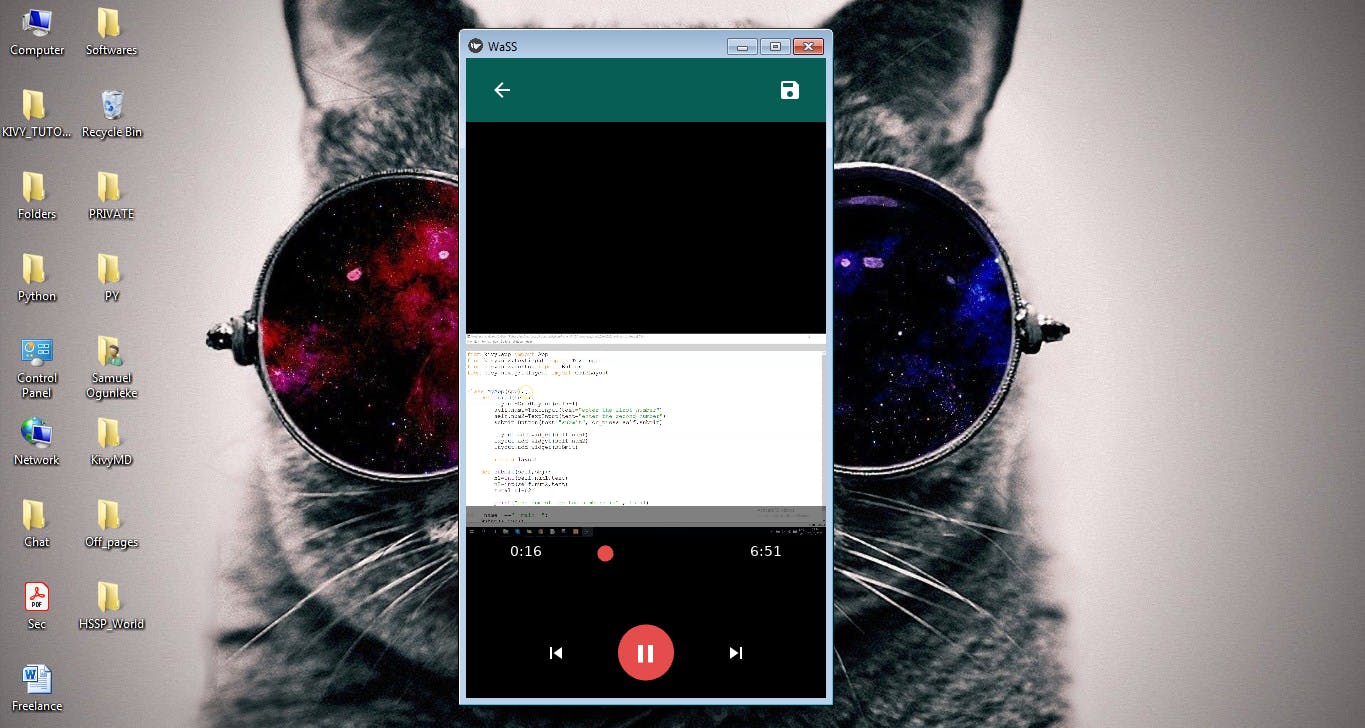
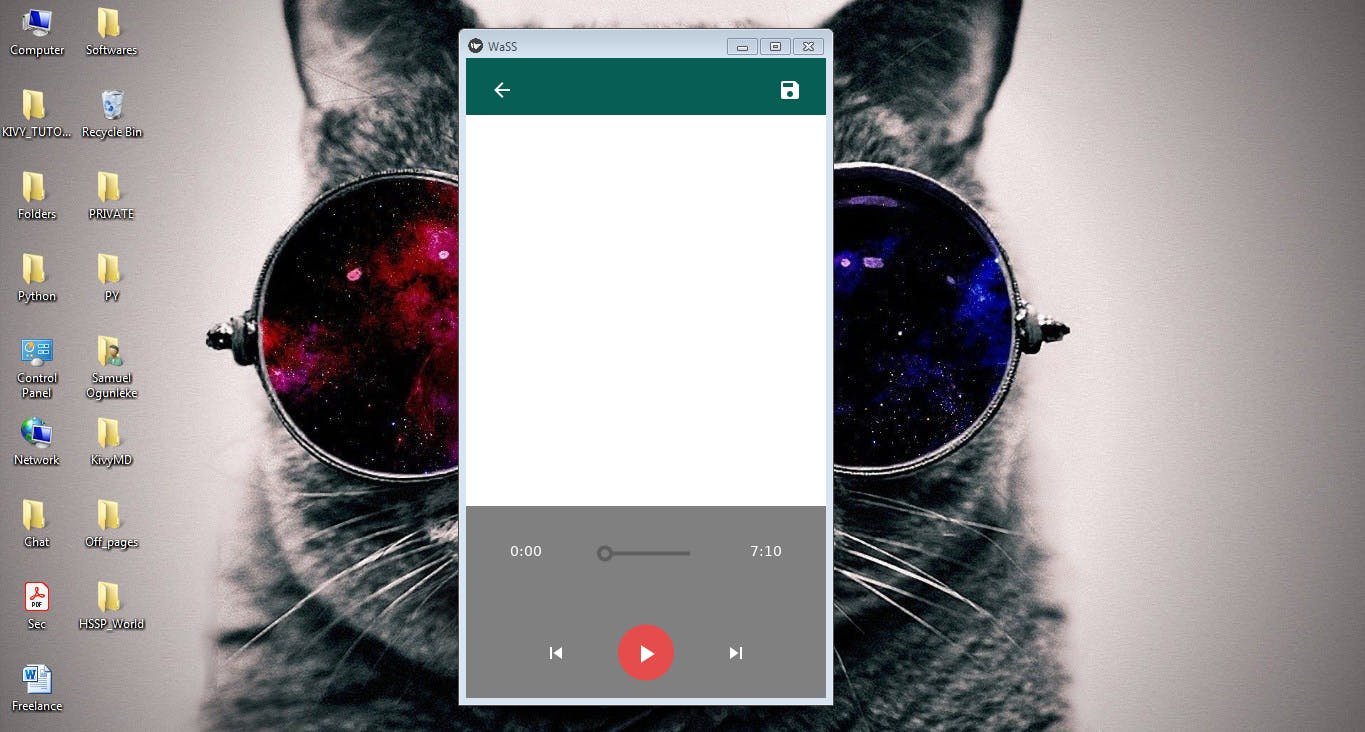
The full screen for the videos has so many things to it. You have the toolbar containing the back and save buttons, the control bar and different functions for the icons. The function of the back button here is different to that of the image screen, you have to consider the state of the video whether it's playing or not. If it's playing, you'd want to stop it before navigating to the home screen so it doesn't play in the background. The function for the save button does pretty much everything the function for images does, the only difference is the pattern of the filename and that the toast message displays that the video has been saved, rather than saying image. Use the third screen in your template to create the screen for the videos. Here, you're using a float layout instead of a carousel because the user would not need to swipe left or right, since the control bar already has previous and next icon buttons.
#...
"""
#...Include this in your KV code, immediately after the image full screen block
    Screen:
        name: "vidfs"

        MDFloatLayout:
            id: vicon
            orientation: "vertical"
            md_bg_color: 0, 0, 0, 1

            MDStackLayout:
                spacing: 25
                MDToolbar:
                    title: ""
                    pos_hint: {"top": 1}
                    size_hint_y: None
                    markup: True
                    left_action_items: [["arrow-left", lambda x: app.back_from_vid()]]
                    right_action_items: [["content-save", lambda x: app.save_video()]]
                    md_bg_color: .0274509803921569, .3686274509803922, .3294117647058824, 1

                MDFloatLayout:
                    id: vplayercon
                    orientation: "vertical"
                    pos_hint: {"center_x": .5, "center_y":.6}
"""
#...
#...
    def save_video(self):
        dnow, c_time = date.today(), time.strftime("%H_%M_%S")
        c_date = dnow.strftime("%m_%d_%y")
        save_as_fn = f"WSS_VID_{c_date}_{c_time}.mp4"
        shutil.copy(self.screen.ids.vid.source, f"WSS/Videos/{save_as_fn}")
        toast("Video saved!")
    def back_from_vid(self):
        if self.screen.ids.vid.state == "play":
            self.screen.ids.vid.state = "stop"
        self.screen.current = "home"

    def VideoFullscreen(self, current_source):
        self.screen.ids.playpause.icon = "play"
        ft = Video(
                    source=self.fs_vids[self.fs_vid_thumbnails.index(current_source[:-4]+".mp4")],
                    state= "stop",
                    pos_hint= {"center_x": .5, "center_y": .55},
                    options= {"allow_stretch": True},
                    )
        ft.bind(position=self.on_position_change, duration=self.on_duration_change)
        self.screen.ids["vid"] = ft
        self.screen.ids.vplayercon.clear_widgets()
        self.screen.ids.vplayercon.add_widget(ft)
        self.screen.current = "vidfs"

#...
If you noticed something, the source for the instance of the Video class was derived from the thumbnails. This is because the thumbnails and the videos have the same names, except for the extension. That's why I selected the filename from the fs_vid_thumbnails list without the extension (png) and added the mp4 extension instead.
Building the Control Bar to Interact with Video Statuses
The control bar allows the user to interact with the current video playing. There are two labels for the current position of the video and the duration for the video and then a slider that allows the user to seek, playing the video from the position.
"""
#...KV
        MDBoxLayout:
            orientation: "vertical"
            pos_hint: {"center_x": .5, "bottom": 1}
            size_hint_y: .3
            spacing: 10
            margin: 10

            canvas.before:
                Color:
                    rgba: 0, 0, 0, .5
                Rectangle:
                    pos: self.pos
                    size: self.size

            MDBoxLayout:
                orientation: "horizontal"
                pos_hint: {"center_x":.5, "center_y":.75}

                MDLabel:
                    id: start
                    text: "0:00"
                    font_size: 14
                    markup: True
                  #  bold: True
                    font_name: "DejaVuSans.ttf"
                    halign: "center"
                    padding: [5,0]
                    theme_text_color: "Custom"
                    text_color: 1, 1, 1, 1
                    pos_hint: {"center_y":.5}
                    size_hint_x: 1


                MDSlider:
                    id:seek
                    min: 0
                    value: 0
                    max: 0
                    hint: False
                    size_hint: 1, None
                    halign: "center"
                    valign: "center"
                    pos_hint: {"center_x":.5, "center_y":.5}
                    color: .9, .3, .3, 1
                    on_active:
                        app.update_seek()

                MDLabel:
                    id: end
                    text: "0:00"
                    font_size: 14
                    markup: True
                   # bold: True
                    halign: "center"
                    font_name: "DejaVuSans.ttf"
                    padding: [5,0]
                    theme_text_color: "Custom"
                    text_color: 1, 1, 1, 1
                    pos_hint: {"center_y":.5}
                    size_hint_x: 1

#...
"""
The on_position_change() function controls the seeking of the video. The default position that Kivy gives the video when loaded is -1 and this changes immediately the video is playing, so you have to convert the position in seconds to minutes and seconds. You will then use the result to update the first label for the current position. On the other way, the on_duration_change() is a function that is called when the video starts playing. Also, the default value for the duration is -1 and it changes immediately after the video starts to play. However, the label for the duration would display 1 before the user plays the video; one way to avoid that is by using a condition that the duration label should only be updated when the duration is not -1.
#...Under your main app class
    def on_position_change(self, instance, value):
        # convert to minutes:seconds
        d = self.screen.ids.vid.position
        minutes = int(d / 60)
        seconds = int(d - (minutes * 60))
        # fix label & position
        self.screen.ids.start.text = '%d:%02d' % (minutes, seconds)
        self.screen.ids.seek.value = value

    def on_duration_change(self, instance, value):
        # convert to minutes:seconds
        d = self.screen.ids.vid.duration
        mins = int(d / 60)
        secs = int(d - (mins * 60))
        if secs != 1:
            self.screen.ids.end.text = f"{mins}:{secs}"
        self.screen.ids.seek.min = 0
        self.screen.ids.seek.max = self.screen.ids.vid.duration

#...
You will create a update_seek() function to change the position of the video. When seeking, you'd use the seek() method from the Video class and pass in an argument of the percentage of the seek, which is the ratio of the desired position and the duration of the video.
#...In your main app class
    def update_seek(self):
##        print(self.screen.ids.seek.value)
        self.screen.ids.vid.seek(self.screen.ids.seek.value / self.screen.ids.vid.duration)
#...
Adding the Play, Previous and Next buttons
These three important buttons give the user the access to control the video as he likes. The play button toggles between the play icon and the pause icon, it shows the play icon when the video has not yet been played or when the video has been paused while it shows the pause icon when the video is playing.
#... KV Code, under the video fullscreen
"""

            MDFloatLayout:
                spacing: 50
                padding: 20
                pos_hint: {"center_x": .5}

                MDIconButton:
                    icon: "skip-previous"
                    theme_text_color: "Custom"
                    text_color: (1, 1, 1, 1)
                    pos_hint: {"center_x": .25, "center_y":.5}
                    on_release:
                        app.play_previous(root.ids.vid.source)

                MDFloatingActionButton:
                    id: playpause
                    icon: "play"
                    pos_hint: {"center_y":.5, "center_x":.5}
                    theme_text_color: "Custom"
                    text_color: 1, 1, 1, 1
                    md_bg_color: .9, .3, .3, 1
                    elevation: 0
                    user_font_size: "30sp"
                    on_release:
                        app.playpause()

                MDIconButton:
                    icon: "skip-next"
                    theme_text_color: "Custom"
                    text_color: (1, 1, 1, 1)
                    pos_hint: {"center_x": .75, "center_y":.5}
                    on_release:
                        app.play_next(root.ids.vid.source)
# The last snippet in your KV code
"""
#...
Finally, there is a need to make the buttons work for what they're meant for, obviously. The play button shows the play icon when the user navigates to the video full screen and it changes accordingly when clicked. This play button controls the video by calling a function that pauses the video if it's currently playing or plays it if the video has not yet been played or if the video was paused, and the icon is updated after every click. You have three more functions to write and your app is ready. The first function is for the play button, the second is for the previous button while the last one is for the next button.
#...In your main app class
    def playpause(self):
        self.screen.ids.vid.state = "play" if self.screen.ids.vid.state == "pause" or self.screen.ids.vid.state == "stop" else "pause"
        self.screen.ids.playpause.icon = "pause" if self.screen.ids.vid.state == "play" else "play"

    def play_previous(self, current_src):
        current_index = self.fs_vids.index(current_src)
        if current_index == 0:
            return None
        else:
            self.screen.ids.vid.source = self.fs_vids[current_index-1]

    def play_next(self, current_src):
        current_index = self.fs_vids.index(current_src)
        if current_index == len(self.fs_vids)-1:
            return None
        else:
            self.screen.ids.vid.source = self.fs_vids[current_index+1]
#...
The play_previous() function takes in an argument of the source of the video playing and returns None if the current video playing is the first one in the list. Otherwise, the function uses the fs_vids list to get the filename of the current video playing and to select the filename element before it, in the list. The selected filename is now made the current source of the Video class. The 'play_next()` function has a similar principle. It returns None if the current video playing is the last one but gets the next filename from the same list and makes it the current source when the current video is not the last one.
Now What?
Your WhatsApp status saver app is now ready for deployment, you can find the full code here. Do not forget to remove the code for the window size before deploying and include the special libraries such as opencv-python in your dependencies in the buildozer.spec file. You can use buildozer or python_for_android or the Kivy Launcher app to deploy the app. Here are some screenshots from my computer, your app should look similar: